Mercruiser outdrive parts drawing *Videos *SEI sterndrive

T.C. Electronics/Marine Home Page

Mercruiser bellows kit *U-Joint *Exhaust *Shift cable *Tools

Bell housing bellows kits for exhaust, u-joint and shift cable

  • Kits are compatible with Mercruiser 4 cylinder, 6 cylinder inline, V6 and V8 models
  • Hoses for the exhaust manifold and bell housing
  • Bellows adhesives and tools required for installation
  • Installation instructions for some items shown below parts chart
  • Need help see Hull truth boating forum for outdrive bellows install help
  • Tech support exploded view Mercruiser parts drawings search by part number or description here

89100 Mercruiser parts exhaust bellow
89100 Exhaust Bellow Alpha / Mercruiser outdrives

P/N 89100 Mercruiser accordion style exhaust bellows includes clamps and clip. Replaces Mercruiser OEM number 18654A1 or Sierra 18-2750. $26.99

For installation help, see our step by step instructions at bottom of page.

89150 Mercruiser exhaust tube
89150 Exhaust Tube 78458A1

P/N 89150 Tube style. Includes clamps and clip. This newer style bellows releases some of the back pressure when idling. Easier installation. *Note - this may cause more noise than the accordion style. Replaces Mercruiser OEM number 78458A1 or Sierra 18-2760. $45.89

21950 Complete Mercruiser Transom Seal Kit
21950 Complete GLM aftermarket Mercruiser transom seal kit

P/N 21950 Transom service kit.
Transom service kit includes:
  • 89100 exhaust bellows
  • 89050 u-joint bellows
  • 89080 shift cable bellows
  • 2 water hoses
  • gimbal bearing and oil seal
  • mounting gasket

Replaces Mercruiser OEM number 30-803097T1 or Sierra 18-2601
Compatible with Mercruiser years 1973 to 1990 models only. $169.89

Transom service kit GLM aftermarket Mercruiser parts

P/N 21950-1972 Transom service kit same as above, but contains older type u-joint bellow
  • Transom service kit includes:
  • 89100 exhaust bellows
  • 89040 u-joint bellows
  • 89080 shift cable bellows
  • 2 water hoses
  • gimbal bearing and oil seal
  • mounting gasket

Bellows parts kit for the years 1967 to 1972 sterndrive models. $199.99

21950-90200 Transom Repair Package

21950-90200 Transom Repair Package

P/N 21950-90200 *Most Popular kit* Complete transom bellows repair package for years 1973 - 1990 Mercruiser models.
Transom service kit includes:
  • 89100 exhaust bellows
  • 89050 u-joint bellows
  • 89080 shift cable bellows
  • 2 water hoses
  • gimbal bearing and oil seal
  • mounting gasket
  • adhesive glue
  • tool required to remove and install the hinge pins on the side of the bell housing. $199.99

89050 Mercruiser
89050
P/N 89050 Bellows installed around the u-joints. Compatible with 1973 - 1990 Mercruiser models only. Make sure to replace this part if your current bellows has any signs of cracks or damage. Includes clamps and 2 clips #89440. Replaces Mercruiser OEM number 60932A4 or Sierra 18-2751. $41.89

For detailed help (including photos) with installing this item, please click on the picture or the part number

89040 U Joint
89040 U Joint bellows
P/N 89040 Bellows sames as above, except this part does not have a ridge on the inside of the lip. Includes clamp and 2 clips #89440. U-joint bellows compatible with years 1967 to 1972. Mercruiser models (s/n 2062141-3443920 or Mercruiser 888 model serial numbers 3106717-3472477). Replaces Mercruiser OEM number 36223A2 or Sierra 18-2752. $48.95

89080 Mercruiser Alpha One shift cable bellows
P/N 89080 Bellows shift cable. Replaces 74639A2 or Sierra 18-2753. $14.89

OMC hose clamp manifold

OMC hose clamp

P/N 01100 Hose clamp use with:
  • 89050 u-joint bellows
  • 89040 u-joint bellows

Replaces Mercruiser OEM number 54-815504372 or Sierra 18-7316. $6.95

01070 Mercruiser clamp and exhaust bellows
01070 Mercury 54-815504348

P/N 01070 Hose clamp.
  • 2 required for #89100 exhaust bellows
  • 1 required for #89150 exhaust bellows

Replaces 54-815504348 or Sierra 18-7314. $4.95

89440 grounding clips
89440 Grounding Clip 54-86049

P/N 89440 Bellows grounding clip. These must be used on parts #89050 u-joint bellows and #89040 u-joint bellows to prevent electrolysis of the hose clamps. Replaces 54-86049. $4.95

Mercruiser engine manifold exhaust hoses

89120
89120

P/N 89120 Upper hose for riser. 4 inch center mounted riser to 4 inch V6 and V8. Replaces 32-44348T or Sierra 18-2748. $40.99

89090
89090

P/N 89090 Lower hose for riser. 3 inch elbow to 3 inch y-pipe. Replaces 32-90949T or Sierra 18-2761. $39.99

89130 Lower exhaust bellow 32-14258T

P/N 89130 Lower - 4 inch elbow to 4 inch y-pipe. Replaces 32-14358T or Sierra 18-2746. $37.99

89060 Elbow Tube 53114A1

P/N 89060 4 and 6 cylinder inline motors. Replaces Mercruiser OEM number 53114A1 or Sierra 18-2759. $44.95

89070 Mercruiser upper exhaust bellow

P/N 89070 3 inch center mounted riser to 4 inch elbow. Replaces Mercruiser OEM number 70981A3 or Sierra 18-2762. $38.99

Installation Tools

90360 Expander Tool 91-45497A1
P/N 90360 Bellows expander tool. Makes installation of #89100 easier. Replaces Mercruiser OEM number 91-45497A1. $77.99

18-9031 Sierra Adhesive
P/N 18-9031 Bellows adhesive compound required for installing the stern drive rubber hoses. This product must be used during installation or the parts will come loose out of the bell housing. $23.99

90200 GLM aftermarket Mercruiser tool hinge pin
90200 Socket 91-45497A1

P/N 90200 Hinge pin tool. Required to remove Mercruiser side hinge pins in housing. Note tools are included in some of bellows kits above. Replaces Mercruiser OEM number 91-78310 or Sierra 18-9861. $22.89

Evinrude Johnson gasket sealing compound

P/N 508235 Gasket sealing compound. $24.95

How To Replace Exhaust and U-Joint Bellows
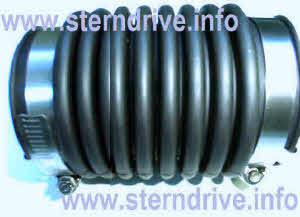
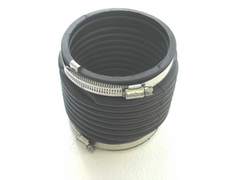
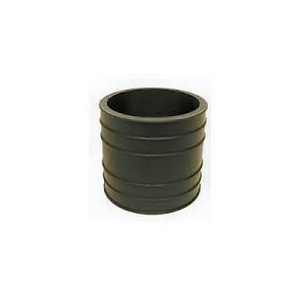
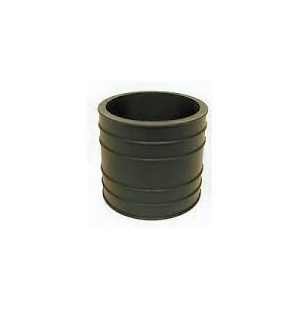
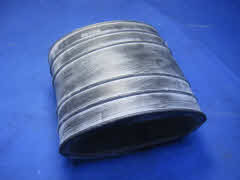
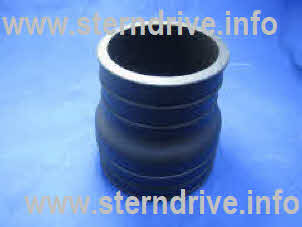
in the Bell Housing

By author Trish Dougherty


  • The original tube (#18654A1 or GLM #89100) bellows is an accordion style rubber hose measuring approximately 5-1/2” in length when not expanded, and an approximate outer diameter of 2-7/8” and inner diameter of 2-12”.
  • As this is made of rubber, over time the material may become brittle and could break due to natural wear and tear. When inspecting this piece, look for any cracks or damage and replace if necessary.
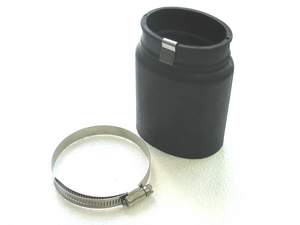
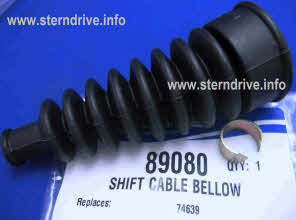
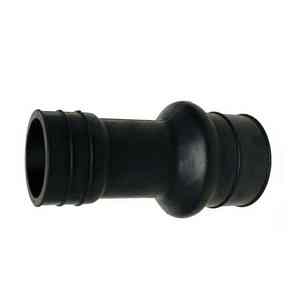
  • You have the option of replacing this with the original style, or the newer open ended tube style. The newer style (#78458A1 or GLM #89150) is approximately 4-3/4” in length, and only uses one clamp for installation into the gimbal housing side.
  • When the drive is lowered, the flanges will fit into the open ended side of the rubber tube. The main benefit of using the newer style bellows is it will release some of the back pressure; however this is a trade off with increased noise. Most people tend to choose the original accordion style as a replacement.
  • There are 2 ways to perform this job - with or without removing the stern drive

Method 1

  1. To do this job without removing the drive, you can simply turn the drive slightly to the port side (left) followed by removal of the clamps on the bottom of the bell housing.
  2. *Please note, this will save time by not having to remove the stern drive, however, installing the exhaust hose to the transom side will be a challenge.
  3. Installing the newer style hose will make installation easier as you only need to install it into one side. Get a firm grip on the gimbal side of the part and begin to pull it out of the housing.
  4. Since the old bellows was likely installed with an adhesive or glue, you will need to pull using force; you can even raise the stern drive to assist with the removal.
  5. Before installing the new part, clean the areas of the bell and gimbal housing where it will sit using a wire brush or course sandpaper, and clean thoroughly with a cleaning agent.
  6. This will ensure the adhesive material will properly seal between the housing flange and rubber piece.
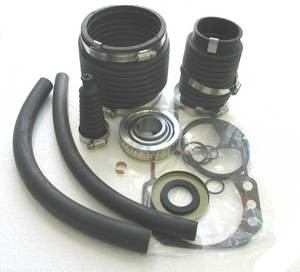
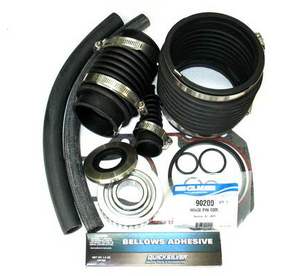
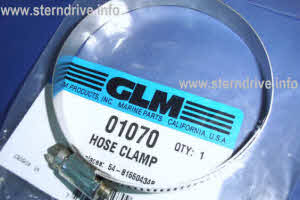
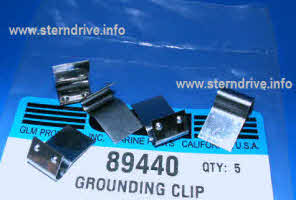
  7. New replacement parts will come with new grounding clips and stainless steel hose clamps – make sure to use the new ones and avoid re-using the old ones as they may be corroded or damaged.
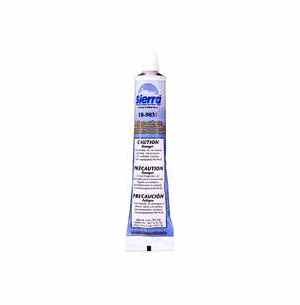
  8. Always make sure to use an adhesive / glue (Sierra #18-9031) when working with these rubber parts. (This can be purchased above, in the repair tool section. Begin by applying the glue to the inside of both ends of the tube (only one side for the newer style piece), and around the mounting flanges on both housings.
  9. Allow the glue to set for a few minutes, and proceed to place the hose clamp on the gimbal side of the hose and install – making sure to tighten the clamp. Next, place the clamp on the other side of the piece and pull open while stretching (using considerable force) onto the flange on the transom side. This will take a considerable amount of time; if you’re not able to get it on you will need to remove the stern drive to finish the installation. (See instructions below). Start engine and check for any leaks.

Method 2

  • To do this job with the out drive removed, it is recommended you use the expander tool (#91-45497A1 or GLM #90360. This can be purchased above in the Mercruiser tool section). You'll notice a hole on the side of the bell housing which allows you to access the screws on the hose clamps using a long screwdriver. This hole is on most models, except for the very old models. Remove both clamps, and begin to remove the rubber hose from both flanges by pulling / wiggling with force. The adhesive applied to the part being removed can make this difficult to get off, so be patient. Next, clean the mounting areas on the housing flanges; and install rubber the hose onto the gimbal housing flange (described in method 1 above). Apply glue on the inside of the other side of the hose along with the hose clamp. Next, using the expander tool, slide it through the housing into the hose and ‘expand’ it. While the tool spreads the rubber open, pull it gently onto the flange on the transom side. Tighten the clamp using the access hole on the side of the housing. Start the engine and look for any leaks.

Optional Installation

  1. Since the above noted job can be very time consuming (3 - 6 hours), it is recommended to inspect your gimbal bearing while your're at it. To check the gimbal bearing, spin in in the housing by hand and take note of the feel and sound it makes. When properly functioning, it should be smooth with no sticking points. If you hear and feel a grinding, or it has some points where it sticks you'll need to replace it. You can purchase gimbal bearing P/N 21905 please look here.
  2. When installing the new bearing, make sure to align the outer tolerance right so the grease hole is visible - pointed up and aligned with the grease input in the housing.
  3. You may also need to align the coupler with the bearing by using the engine alignment tool P/N 90050 please look here

Outdrive and bell housing